How to use Claude Code in VS Code: a step-by-step guide
By Shubhranshu, creator of claudeagents · Last reviewed
Claude Code is Anthropic’s coding assistant, and the official VS Code extension lets you use it without leaving your editor. You ask in plain English, Claude reads your project, and it proposes changes as side-by-side diffs that you accept or reject.
This guide takes you from nothing installed to your first reviewed change, one step at a time, with a picture for each step. It then covers permission modes, checkpoints, shortcuts, settings, a safe everyday workflow and fixes for the most common problems.
Everything comes from Anthropic’s own VS Code documentation and the Marketplace listing, checked on 14 November 2026. The extension updates often, so menus can differ slightly from the pictures. claudeagents is an independent project and is not affiliated with Anthropic.
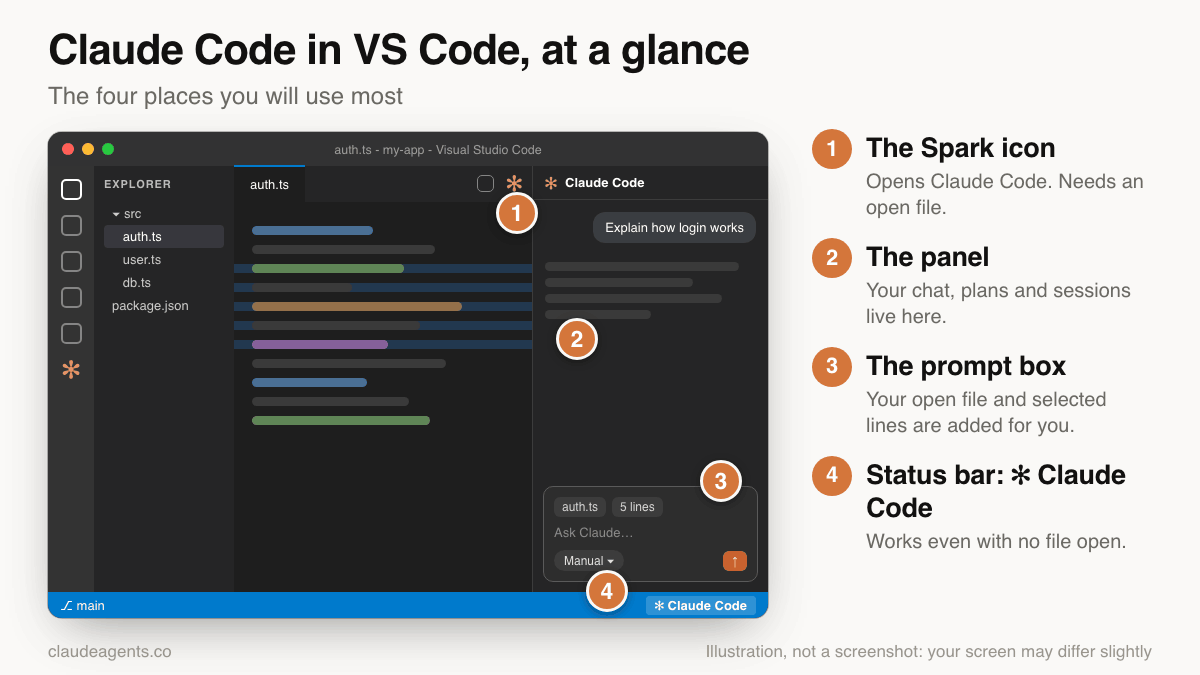
What you need before you start#
You need four things. Most people already have all of them.
- VS Code 1.94.0 or newer. Older guides mention 1.98. Anthropic’s current docs say 1.94.0, so use that number. To check, open Help > About (Code > About Visual Studio Code on Mac).
- A Claude account that can use Claude Code. That means a paid Claude plan (Pro, Max, Team or Enterprise) or a Claude Console account with API credit. The free Claude.ai plan does not include Claude Code.
- A folder open in VS Code. Claude works on the project you have open, so use File > Open Folder first.
- A trusted workspace. VS Code asks whether you trust the folder’s authors. Claude Code needs a trusted workspace to edit files and run commands.
You do not need to install the Claude Code command line first. The extension includes what it needs. If you also want the terminal version, see the installation guide.
Step 1: Install the Claude Code extension#
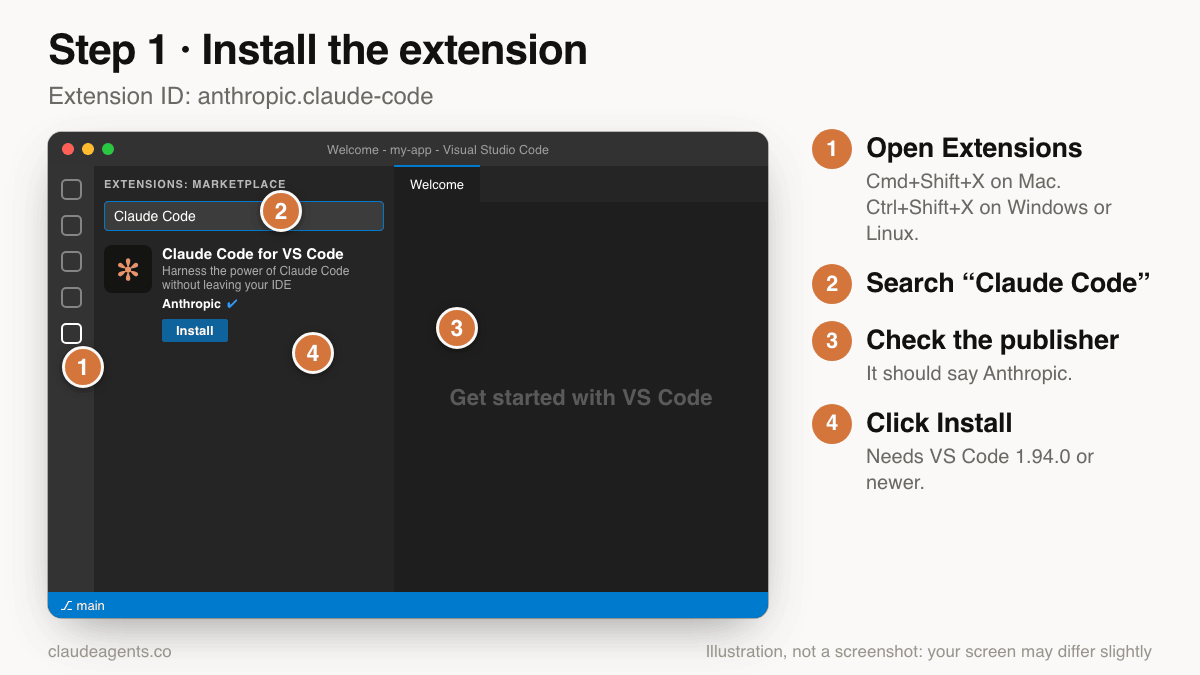
- Open the Extensions view with Cmd+Shift+X on Mac or Ctrl+Shift+X on Windows and Linux. You can also click the four-squares icon in the left Activity Bar.
- Search for Claude Code.
- Check that the publisher is Anthropic. The extension ID is
anthropic.claude-code. Several look-alike extensions exist, so check this before you install. - Click Install. If the button says Reload afterwards, click it.
The same extension works in VS Code forks that use the Open VSX or VS Code Marketplace, such as Cursor. Install it the same way. Anthropic also provides a separate integration for JetBrains IDEs, which this guide does not cover.
Step 2: Open the Claude Code panel#
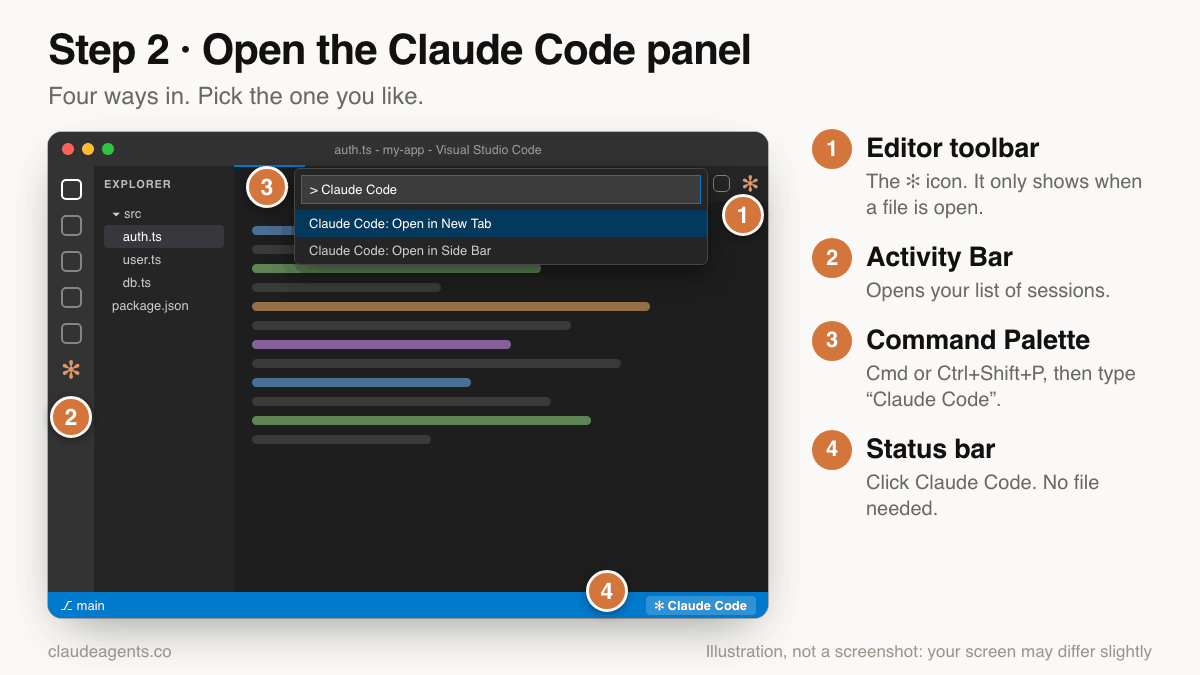
There are four ways in. They all open the same panel.
- Editor toolbar. Click the orange Spark icon at the top right of the editor. It only shows while a file is open.
- Activity Bar. Click the Spark icon in the left bar to open your list of sessions.
- Command Palette. Press Cmd+Shift+P or Ctrl+Shift+P, type
Claude Code, and choose Open in New Tab or Open in Side Bar. - Status bar. Click Claude Code at the bottom right. This works even when no file is open.
If you cannot see the Spark icon, open a file first, or use the status bar button. A missing icon is the most common “it did not install” scare, and it is almost always just that no file is open.
Step 3: Sign in#
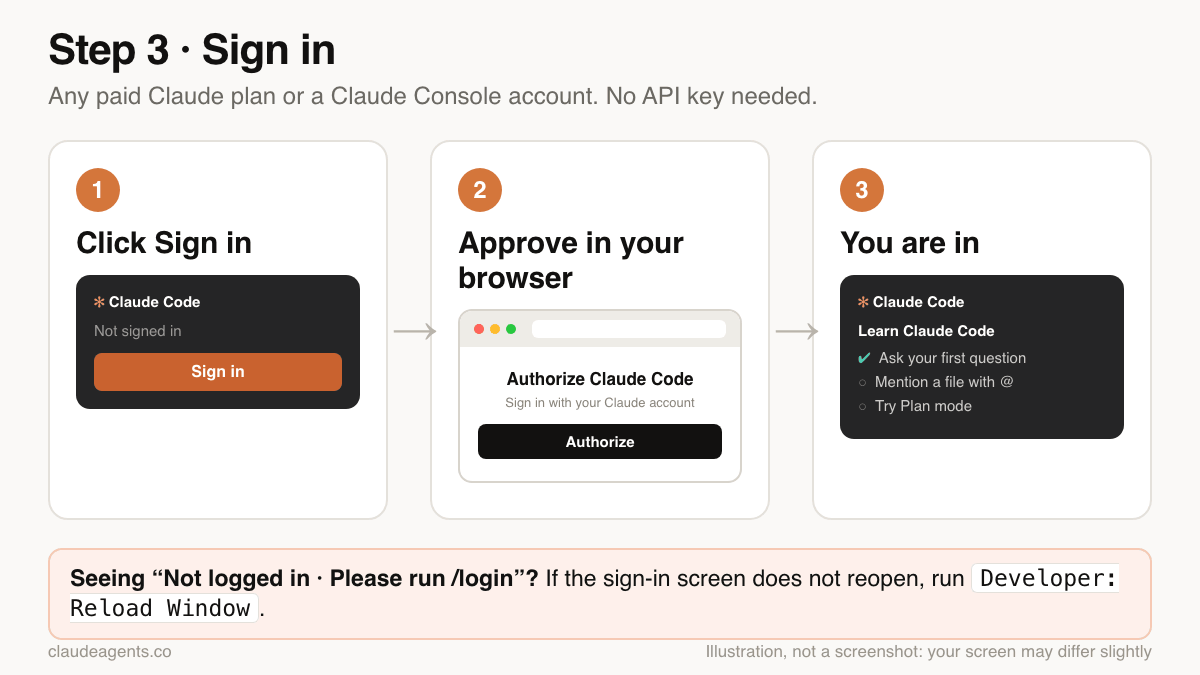
- In the Claude Code panel, click Sign in.
- Your browser opens. Log in with your Claude account (or your Console account) and click Authorize.
- Return to VS Code. The panel is now ready, and a short checklist helps you try the main features.
If the panel says Not logged in · Please run /login and the sign-in screen does not come back, run Developer: Reload Window from the Command Palette and try again. You never need to paste an API key for a normal Claude account sign-in.
Treat your sign-in like a password. Do not share your screen while the browser page is open, and never paste tokens into the chat.
Step 4: Ask your first question#
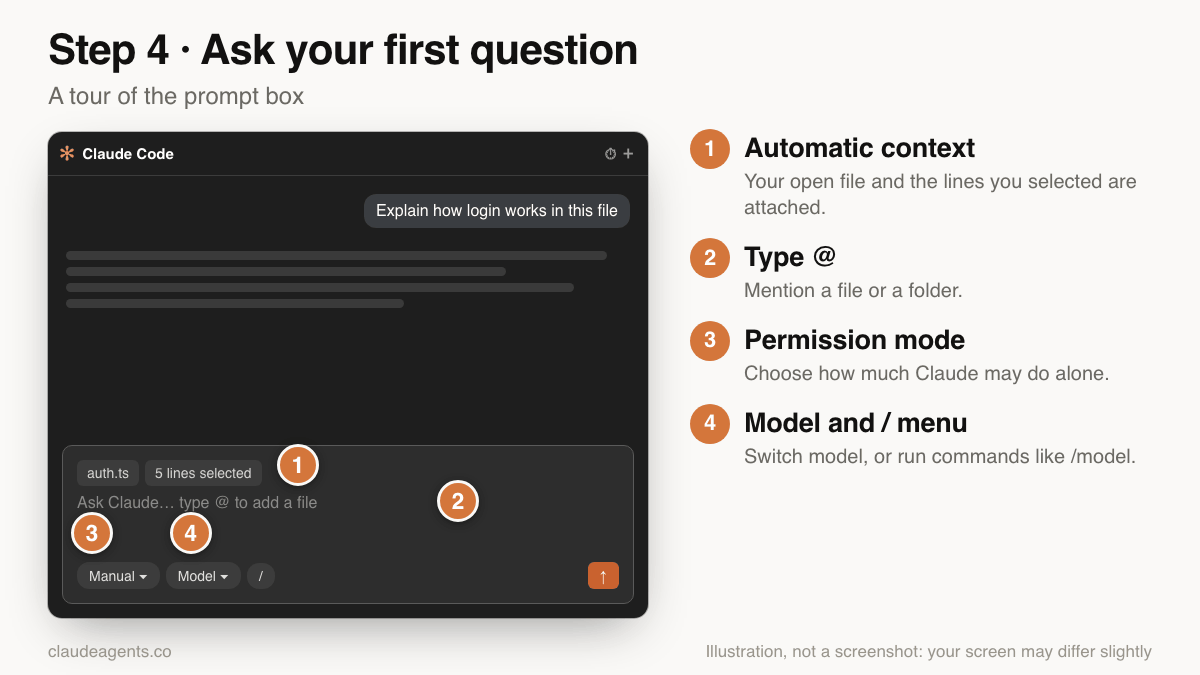
Start with a question, not a change. Open any file, then type a prompt in the box at the bottom of the panel and press Enter. A good first prompt is:
Explain how this project is organized. Which files should I read first?Look at the prompt box. Four parts matter:
1. Automatic context. Claude sees the file you have open and any lines you have selected, and the box shows chips for them. 2. Type @ to mention a file or folder. 3. The mode button controls how much Claude may do without asking (Step 6). 4. The model and slash menu lets you switch models or run commands such as /model.
Press Shift+Enter for a new line without sending. Anything you type that starts with / opens the command menu.
Step 5: Give Claude the right context#
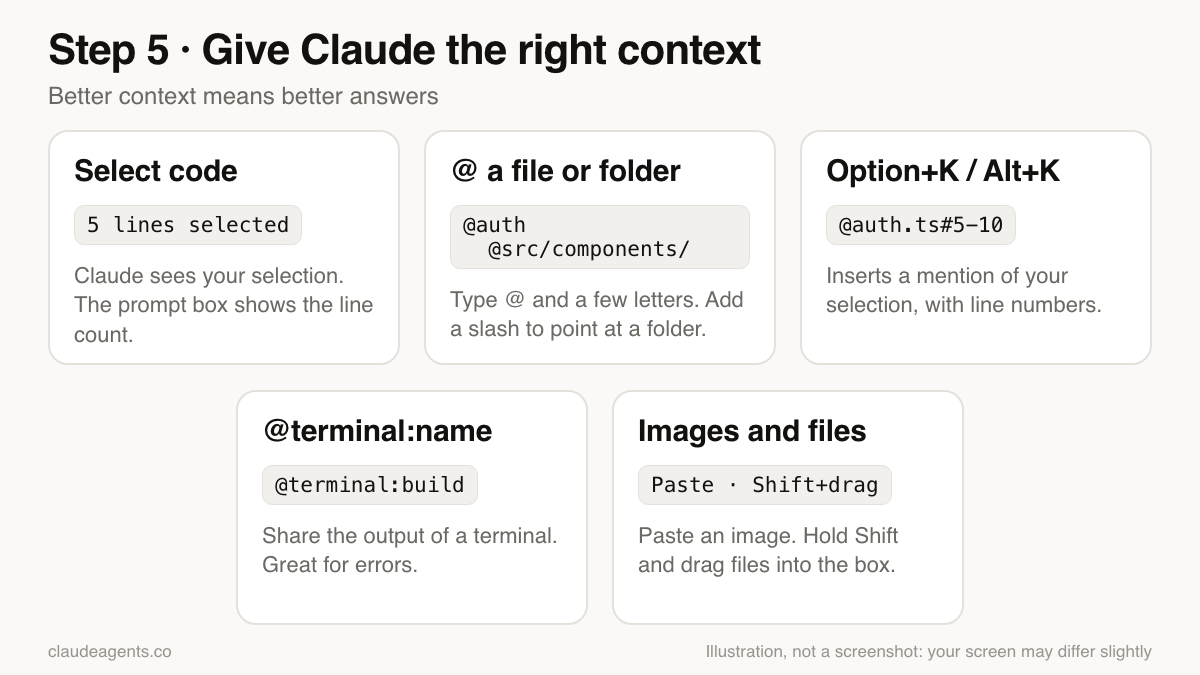
Claude gives better answers when it knows exactly what you mean. The extension gives you five easy ways to say it.
- Select code. Highlight lines in the editor. Claude sees the selection, and the prompt box shows the line count.
- Mention a file or folder with @. Type
@authand pick a match. Add a slash, like@src/components/, to point at a whole folder. - Option+K (Mac) or Alt+K (Windows and Linux). Inserts a mention of your current selection with line numbers, such as
@auth.ts#5-10. - Mention a terminal with @terminal:name. Share the output of a build or test run. This is the best way to hand Claude an error message.
- Paste images and files. Paste a screenshot straight into the box. Hold Shift while you drag files in to attach them.
A useful habit: name the file and the goal in the same sentence. “In @checkout.ts, the total ignores the discount code. Find out why” beats “checkout is broken”.
Step 6: Choose a permission mode#
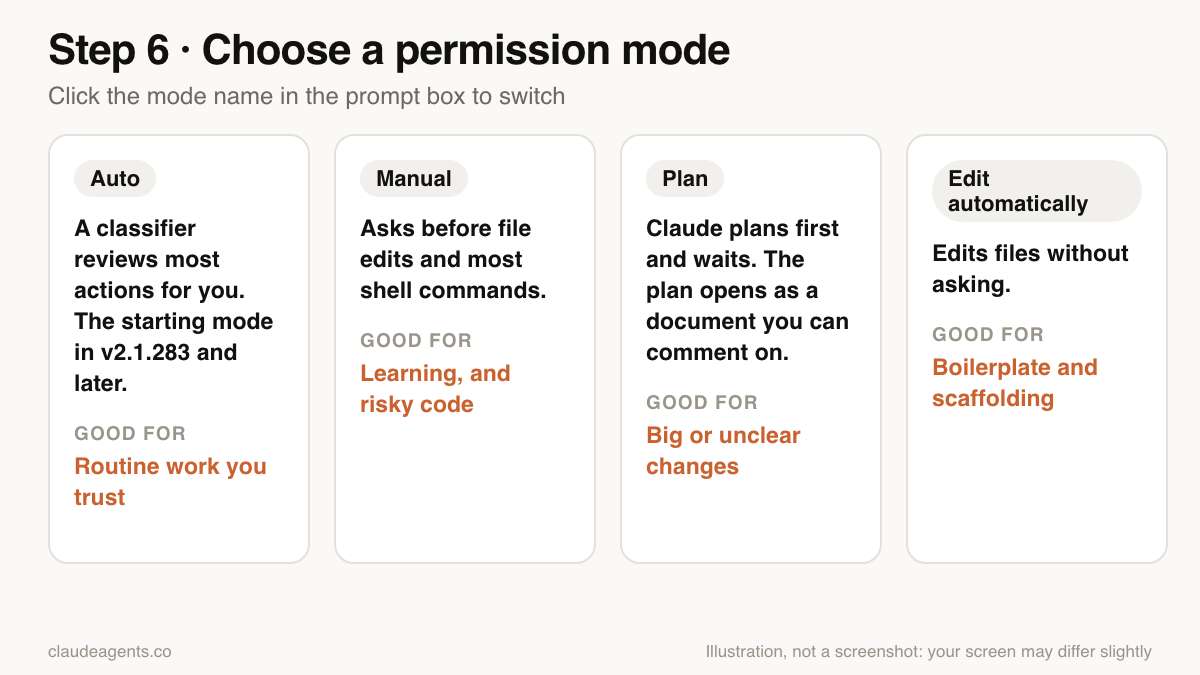
The permission mode is your seatbelt. It decides what Claude may do before it asks you. Click the mode name in the prompt box to change it.
| Mode | What it does | Good for |
|---|---|---|
| Auto | A classifier reviews most actions for you. This is the starting mode in extension v2.1.283 and later. | Routine work you trust |
| Manual | Asks before file edits and most shell commands. | Learning, and risky code |
| Plan | Claude writes a plan first and waits. The plan opens as a document you can comment on. | Big or unclear changes |
| Edit automatically | Edits files without asking. | Boilerplate and scaffolding |
Mode names and the default change between versions. If your menu looks different, update the extension and see the permissions page in Anthropic’s docs.
Our advice for your first week: use Manual so you see every change, and use Plan for anything bigger than a small fix. Move to Auto once you know what Claude tends to do. You can change a project’s default in .claude/settings.json; the permissions and settings guide shows how.
Step 7: Review every change#
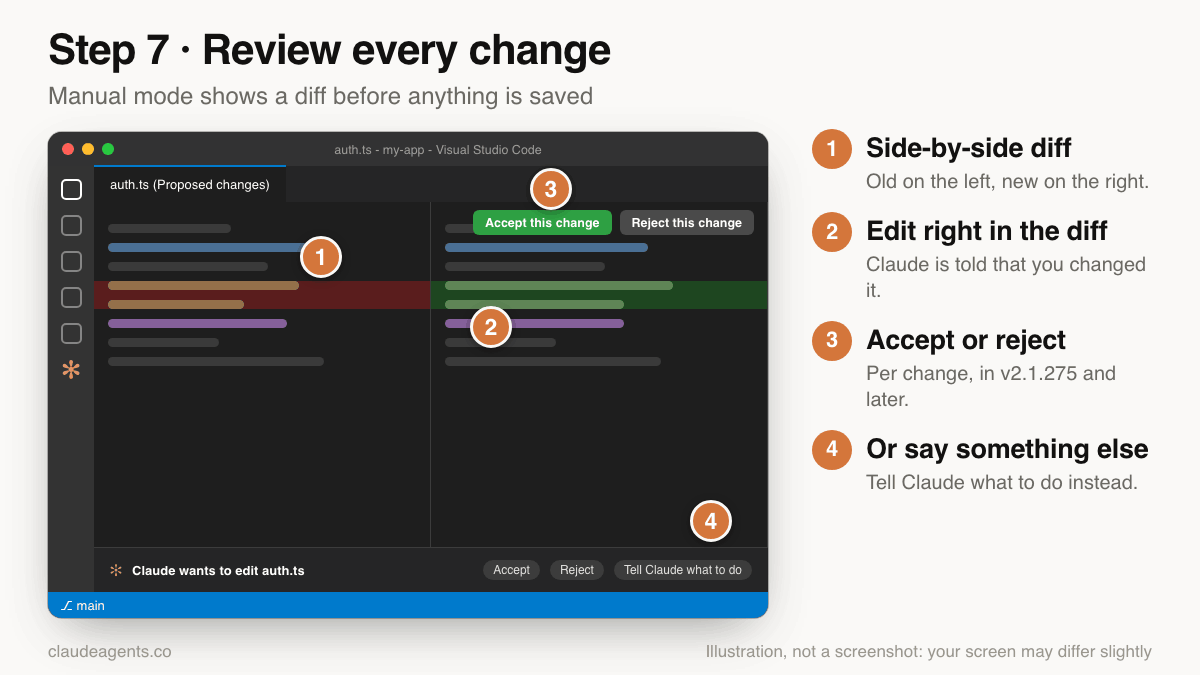
When Claude wants to edit a file in Manual mode, VS Code opens a side-by-side diff. The old code is on the left and the proposed code on the right. Nothing is saved until you decide.
- Read it like a code review. Look for changes you did not ask for, deleted code, and new dependencies.
- Edit the proposal directly. You can type in the right-hand side. Claude is told that you changed it.
- Accept or reject. In extension v2.1.275 and later you can accept or reject individual changes inside a file, not only the whole file.
- Or say something different. Choose Tell Claude what to do and explain what you want instead.
Reviewing is the step that separates good results from messy ones. If a diff is too big to read, reject it and ask for a smaller step.
Step 8: Undo a mistake with checkpoints#
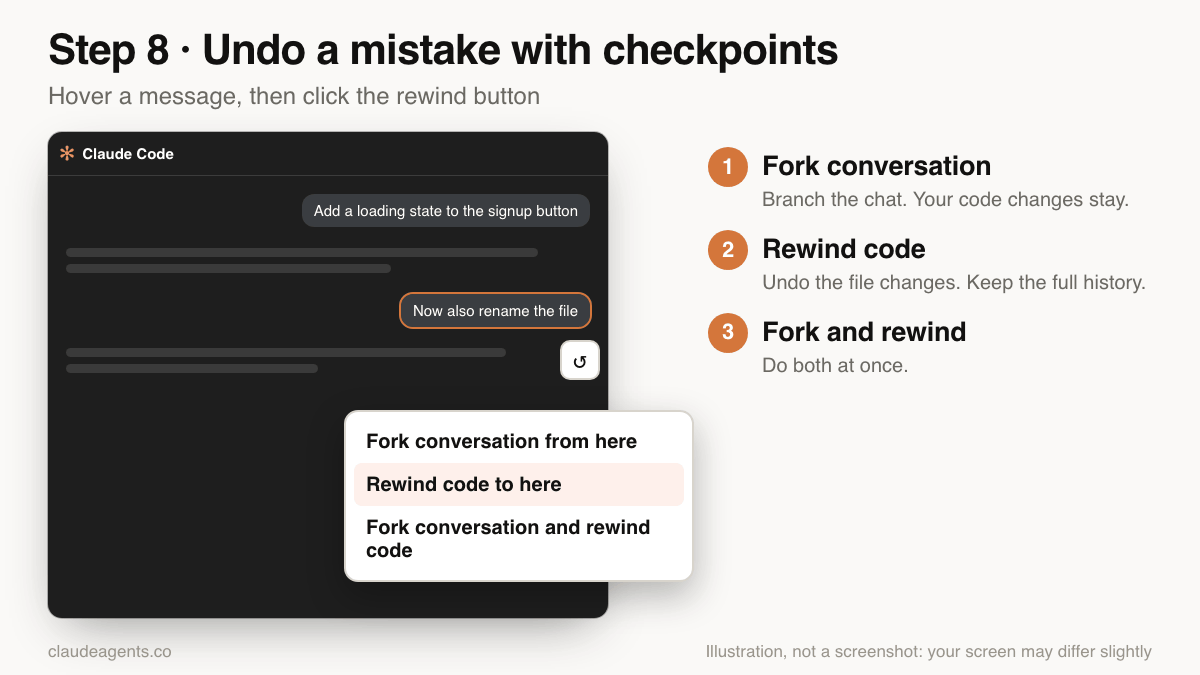
The extension saves a checkpoint at each of your messages. Hover over a message and click the rewind button to choose one of three options:
- Fork conversation from here. Start a new branch of the chat from that point. Your code changes stay as they are.
- Rewind code to here. Undo the file changes made after that message, and keep the conversation.
- Fork conversation and rewind code. Do both.
One important limit: checkpoints track the edits Claude makes to files. They do not undo shell commands, such as a deleted folder or a database change. Keep your project in Git and commit before bigger tasks. The Git workflow guide shows a safe routine.
Work on several things at once#
You are not limited to one chat. Each conversation is its own session with its own history.
- New tab or side bar. Open another Claude Code tab from the Command Palette to run a second conversation next to the first. You can drag tabs like any editor tab.
- Past sessions. Use the session list (the clock icon in the panel, or the Activity Bar icon) to search and reopen old conversations.
- Separate branches. For two tasks that touch the same files, use
git worktreeso each session works in its own folder and they cannot overwrite each other.
Extension or terminal: which should you use?#
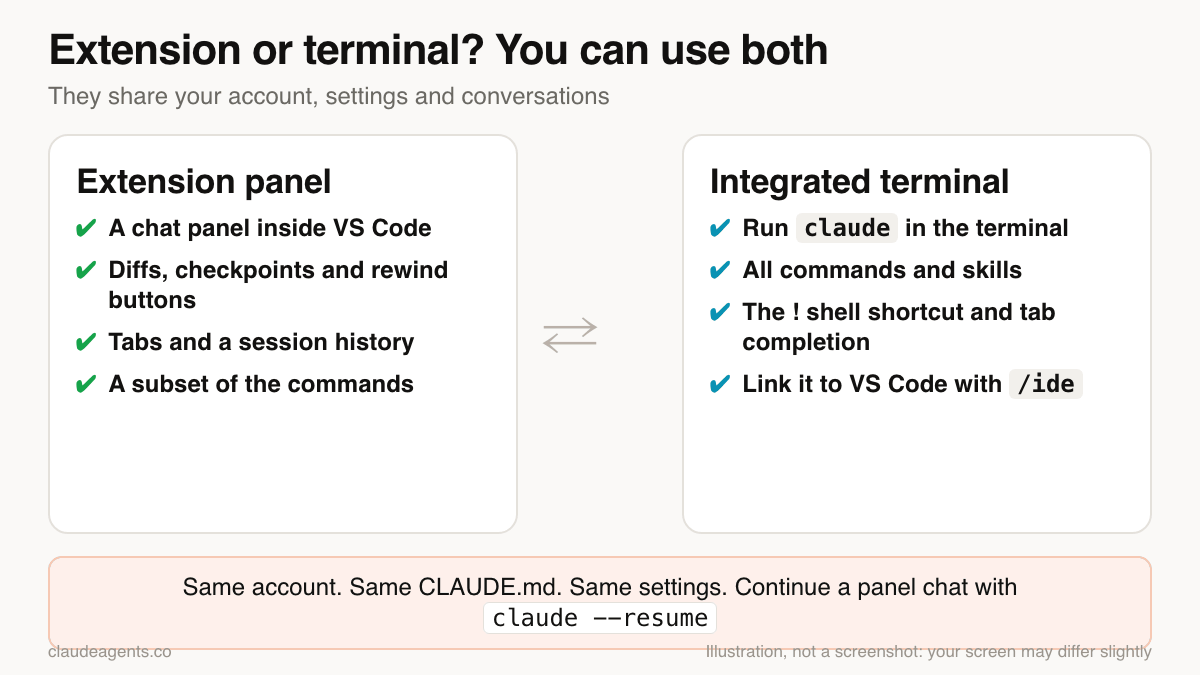
The extension is the friendliest place to start. The terminal version has the full set of commands. The good news is that you do not have to choose, because they share your account, your CLAUDE.md file and your settings.
| Extension panel | Integrated terminal (`claude`) | |
|---|---|---|
| Best for | Day-to-day work with visual diffs | Power features and scripting |
| Review changes | Side-by-side diffs and checkpoints | Text prompts; VS Code diffs when linked with /ide |
| Commands | A subset of slash commands | All commands and skills |
| Shell shortcut | Not available | Type ! to run a command |
| Settings and CLAUDE.md | Shared | Shared |
Features are added to both over time. If a command is missing in the panel, try it in the terminal.
To continue a panel conversation in the terminal, run claude --resume in the integrated terminal and pick it from the list. If you start claude in an external terminal and want VS Code to show its diffs and use your selection, run /ide inside Claude Code to link them.
Keyboard shortcuts worth learning#
These are the defaults from Anthropic’s docs. You can change any of them in VS Code’s Keyboard Shortcuts editor.
| Action | Mac | Windows and Linux |
|---|---|---|
| Switch focus between the editor and Claude | Cmd+Esc | Ctrl+Esc |
| Open Claude in a new tab | Cmd+Shift+Esc | Ctrl+Shift+Esc |
| Insert a mention of your selection | Option+K | Alt+K |
| Open the Command Palette | Cmd+Shift+P | Ctrl+Shift+P |
| New line in the prompt | Shift+Enter | Shift+Enter |
Settings you may want to change#
Open VS Code Settings (Cmd+, or Ctrl+,) and search for Claude Code. These are the ones people reach for first. Setting names can change, so use the search box if one is missing.
| Setting | What it does |
|---|---|
claudeCode.selectedModel | Which model new conversations use. |
claudeCode.initialPermissionMode | The mode a new conversation starts in. |
claudeCode.preferredLocation | Open Claude in the side bar or in an editor tab. |
claudeCode.useTerminal | Use the terminal interface instead of the graphical panel. |
claudeCode.useCtrlEnterToSend | Send with Ctrl+Enter, so Enter adds a new line. |
Project rules, permissions and hooks live in .claude/settings.json and are shared with the terminal version. See configuration basics.
Your first real workflow#
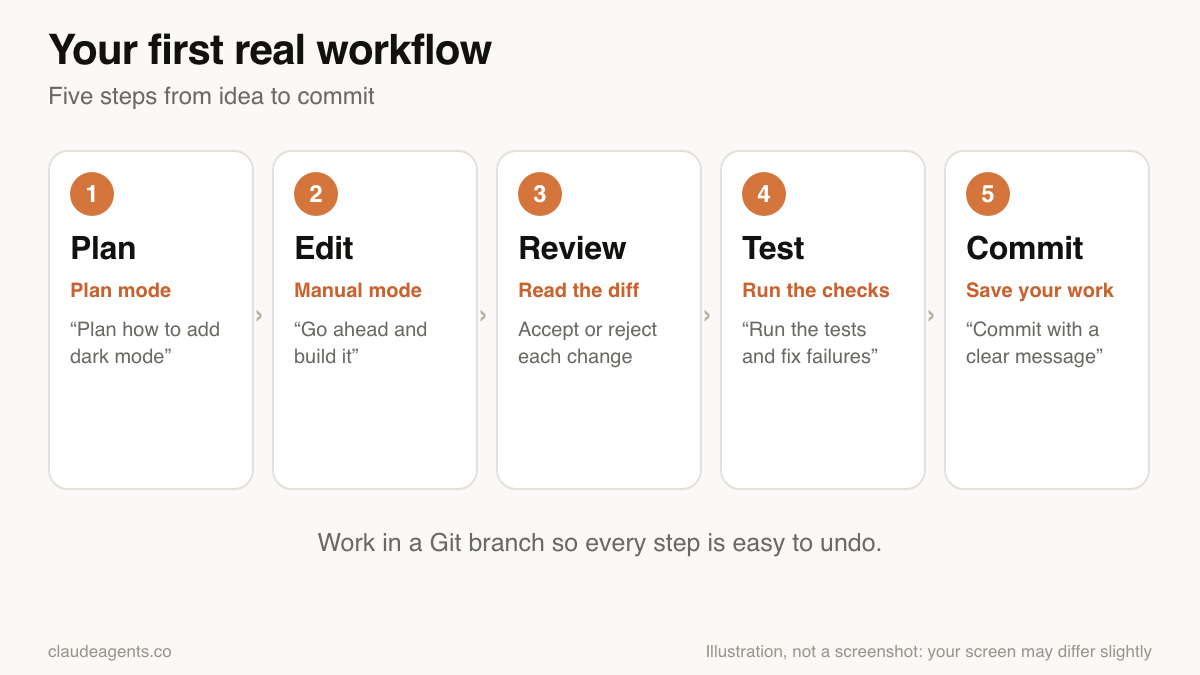
Here is a routine you can copy for almost any small feature. Start on a new Git branch, so you can throw everything away if you need to.
- Plan. Switch to Plan mode and ask for a plan. Read it and comment on anything wrong.
- Edit. Switch to Manual mode and say “Go ahead and build it”.
- Review. Read each diff. Accept, reject or edit.
- Test. Ask Claude to run your tests and fix failures.
- Commit. Ask for a commit message that explains why the change was made.
Plan how to add a dark mode toggle to the settings page. Do not change any files yet.

Go ahead and build it. Keep each change small.

Run the tests and fix any failures. Tell me what you changed.

Commit these changes with a clear message that explains why.
Teach Claude your project with CLAUDE.md#
Every new conversation starts blank, apart from a file called CLAUDE.md in your project. Claude reads it at the start of each session, so it is the best place for rules you are tired of repeating: how to run the tests, your code style, folders to avoid.
The quickest way to start is to type /init in the panel. Claude looks around your project and writes a first draft. Read it, trim anything that is wrong, and keep it short. A file full of stale instructions does more harm than none.
The configuration basics guide and our CLAUDE.md template show what a good one looks like.
Connect other tools with MCP#
MCP (Model Context Protocol) lets Claude use outside tools, such as GitHub, a database or your documentation. Run /mcp in the panel to see which servers are connected, and sign in to the ones that need it.
Adding a server is a terminal command, and the extension then uses it. The MCP setup guide has the exact steps. Only add servers from sources you trust, because a server can read the data you let it reach.
Troubleshooting#
| Problem | What to try |
|---|---|
| No Spark icon in the toolbar | Open a file first, or use the Claude Code button in the status bar. |
| “Not logged in · Please run /login” | Run Developer: Reload Window, then click Sign in again. |
| The extension will not install | Update VS Code to 1.94.0 or newer, then retry. |
| Claude cannot edit files | Make sure the workspace is trusted (Manage Workspace Trust in the Command Palette). |
| Changes are not appearing in the diff | Check that you are in Manual mode, not Edit automatically. |
| A command works in the terminal but not the panel | The panel supports a subset of commands. Run it in the terminal. |
| Behaviour looks different from this guide | Update the extension. Versions change the modes and menus. |
Still stuck? The troubleshooting page covers installation and sign-in problems in the terminal version too.
Mistakes to avoid#
- Accepting diffs without reading them. The fastest way to ship a bug.
- Starting on your main branch. Make a branch first. It makes every mistake free to undo.
- Asking for everything at once. Small steps give small diffs you can review.
- Trusting checkpoints for everything. They do not undo shell commands. Use Git.
- Installing a look-alike extension. Check that the publisher is Anthropic.
- Leaving secrets in chat. Do not paste passwords, keys or tokens into a prompt.
Frequently asked questions
Is the Claude Code VS Code extension free?
The extension is free to install, but Claude Code itself needs a paid Claude plan (Pro, Max, Team or Enterprise) or a Claude Console account with API credit. The free Claude.ai plan does not include it.
Which version of VS Code do I need?
VS Code 1.94.0 or newer, according to Anthropic’s current documentation. Some older guides say 1.98. If the extension will not install, update VS Code first.
Do I need to install the Claude Code command line first?
No. The extension works on its own. Installing the terminal version is optional and gives you the full command set. They share your account, CLAUDE.md and settings.
Does Claude Code work in Cursor and other VS Code forks?
Yes. The same extension installs in VS Code forks that offer an extension marketplace, such as Cursor. Install it from the Extensions view and sign in the same way.
Why can’t I see the Spark icon?
The icon in the editor toolbar only shows while a file is open. Open any file, or click Claude Code in the status bar at the bottom right, which works without a file.
Will Claude change my files without asking?
Not in Manual mode, where it shows a diff and waits. In Edit automatically mode it edits files without asking, and in Auto mode a classifier reviews most actions for you. Choose the mode with the button in the prompt box.
Can I undo what Claude changed?
Yes. Hover over one of your messages and use the rewind button to undo file edits made after it. Checkpoints do not cover shell commands, so keep your project in Git too.
Should I use the extension or the terminal?
Start with the extension: it has visual diffs and checkpoints. Use the terminal when you need a command the panel lacks. You can switch at any time, and claude --resume continues a panel conversation.